Point of Sale Settings: Rental Contracts

October 01, 2024
Your Rental Contract functionality should require very little time to configure in Music Shop 360. Within your initial Rental Contract transactions, you can configure how each will work as needed. This article will cover how to set your preferences in the Settings area.
Recurring Processing Tokenization
For recurring automated billing to work with your Rental Contracts, you will need to have recurring processing tokenization. If you use MusicShop360 Payments, this is already in place for you. If you use a third-party processor, you will not be able to set up automated billing within the Rental Contracts module.
Settings for Rental Contracts
To activate your Rental Contracts system, you'll need to already be using our Point of Sale system, and you'll need to speak with someone on our team. You may already be working with a Client Success Manager, but if you have already launched your system, you can just call us at 385-354-6655 and use option 2, and we can look into getting that activated for you.
Once the system is activated for you, go to the Admin Button with your username in the upper right and click on Settings > POS Settings > Rental Contracts.

General Settings
The General section of your Rental Contracts settings tab is for default values that you are free to change on each contract you create. The system will populate the various fields with the information you would usually use with an average Rental Contract, and each of those fields is editable when you start a contract, if needed. Here are the areas you need to configure:
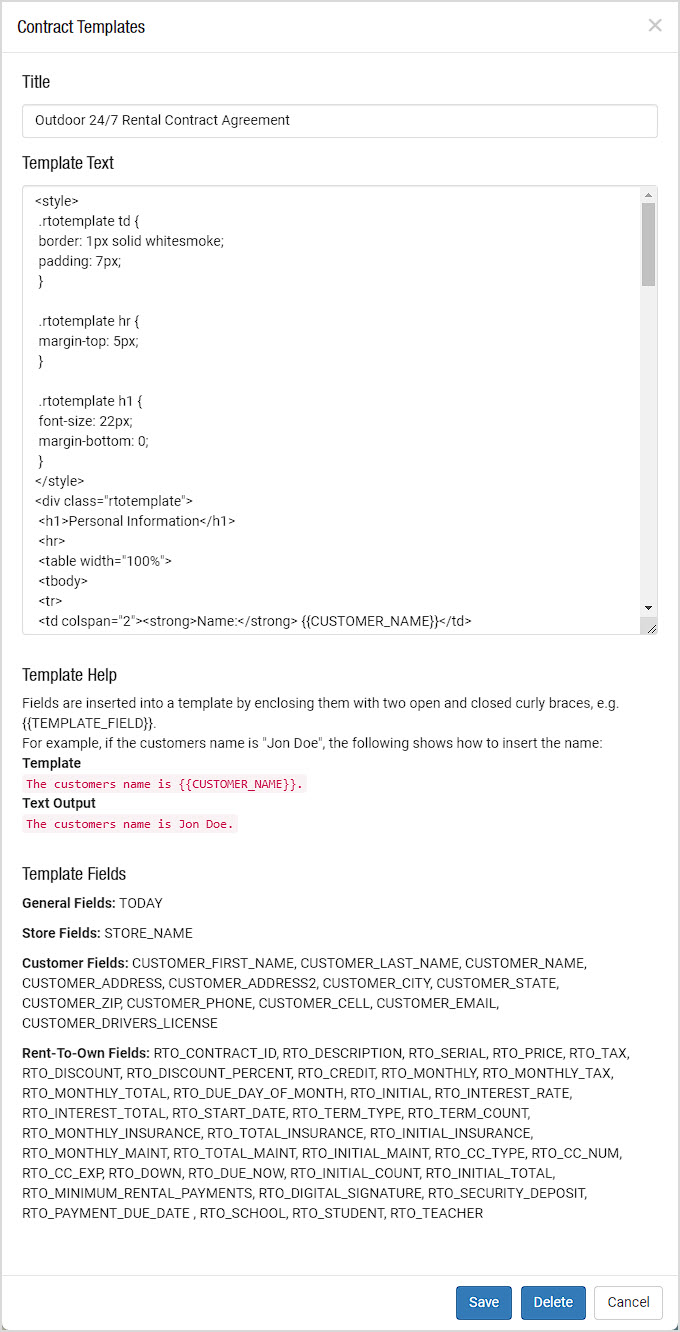
- Manage Contract Templates - Click the Configure button to see the default contract template or to upload and configure your own. This contract system allows for live fields that auto-fill important information for you (see examples below of the items in brackets). When creating a template or editing one, you are able to use HTML and CSS if you like and give each template a unique title. You can make as many templates as you might need.
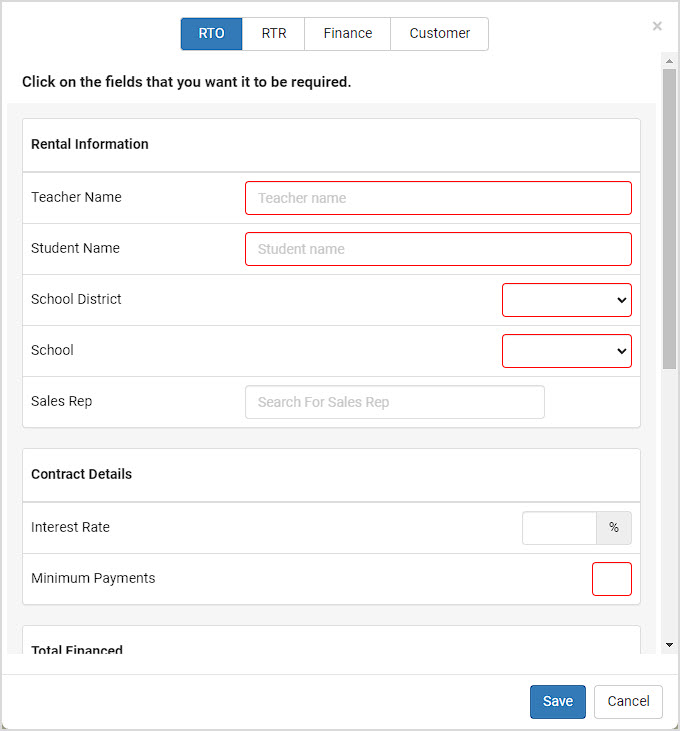
- Require Contract Information - This function allows you to set which fields are required in order to save the entry for RTO Contracts, RTR Contracts, Finance Contracts, and the data fields on the first tab of the Edit Customer profile area. If you look at the example below, you just click on whatever fields you want to make required and they turn red. Please note that on the Customer tab, you can also make any Custom Data Fields for Customers you may have created required.
- Prorate First Payment - If this is turned on, the initial monthly payment required on a contract will be partial based on how many calendar days are left in the month before the next billing date.
- Allow Discounts on All Rental Contracts - With this setting On, you will be able to discount any Rental Contract regardless of how the product(s) in the rental are set for discounts.
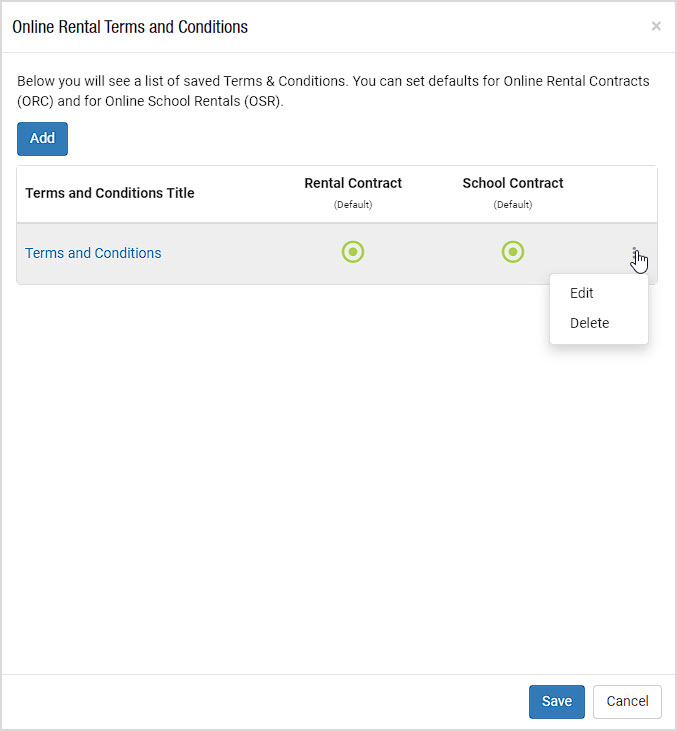
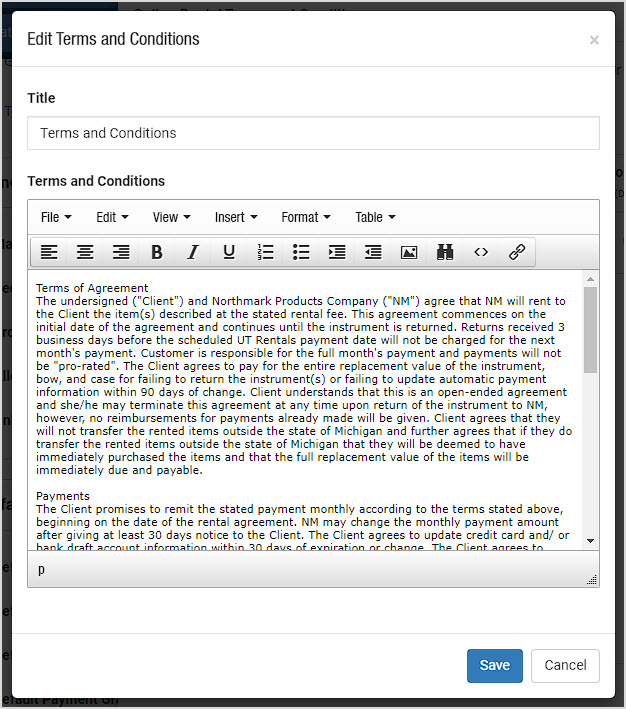
- Online Rental Terms and Conditions - You are able to add separate Terms and Conditions statements and set them to be the defaults for standard Rental Contracts sold online and Online School Rentals statements. When creating a new Terms and Conditions statement, you can give it a Title and you can use the content editor pictured below to post important information about how you handle your contracts.
Default Contract Settings
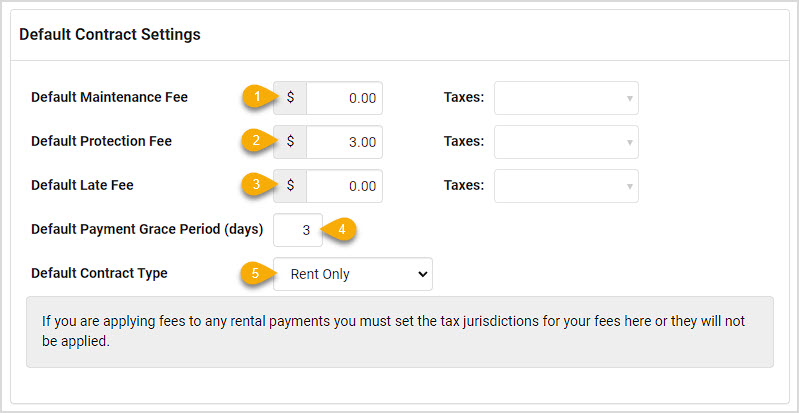
- Default Maintenance Fee - This fee can be for maintaining the contract, and can represent whatever monthly work you and your team do to maintain the rent to own contract, including periodic service on the item(s). You can click the drop-list for a tax rate you have set up in your system, if taxes apply to your fees.
- Default Protection Fee- You can break up the protection service on the item into monthly payments with this field. It is recommended to itemize this expense in this way, to allow the system to track the expense and also to show the customer the breakdown of what they are paying for. As with fees, you can also click the drop-list for a tax rate you have set up in your system, if taxes apply to your protection service.
- Default Late Fee - A late fee is a good way to make sure your renters take their payments seriously, just make sure they understand up front how your fees work and when they will be applied. You are able to apply the appropriate Tax to your late fees, if needed.
- Default Payment Grace Period (days) - This is the number of days you allow past the due date of each payment before the payment is considered to be late.
- Default Contract Type - Using this drop-list, you can set the default type to be either Rent to Own or Rent Only for new contracts you create. Within the new contract, it can always be changed before finalizing the contract.
Contract Exchange Profiles, Online Settings, and Autobill Settings
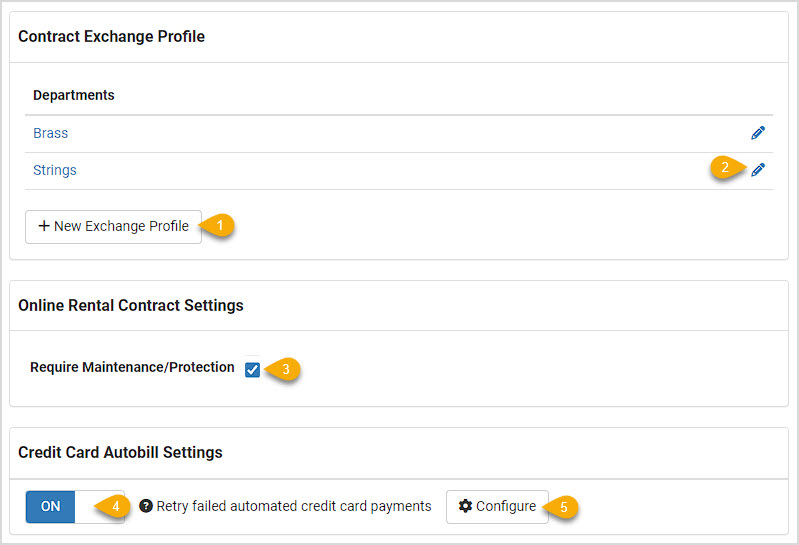
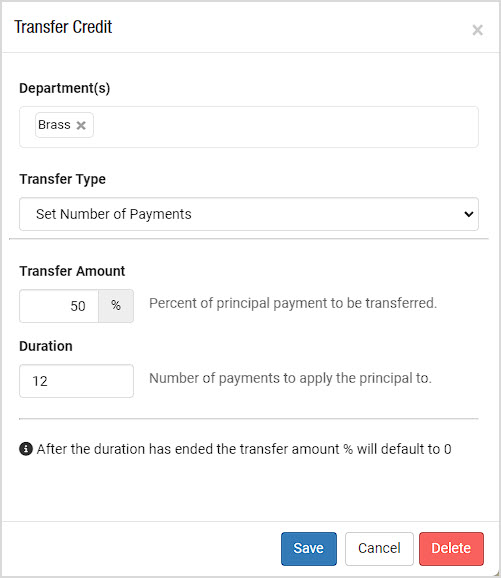
- Contract Exchange Profile- This function allows you to set defaults for how you handle exchanges within Departments of different types of items. You're able to add any number of Departments to a profile, as pictured below. Click the +New Exchange Profile button to make a new profile. There are two modes for the profile to function: You can set a flat percentage of the principal that will transfer in the exchange by setting Entire Contract as the Transfer Type from the drop-list. Or, if you like, you can use Set Number of Payments as the Transfer Type, which would allow you to set a time frame for how long the exchange item has been with the customer for which you would allow principal to be transferred. For example: If you don't want to allow items that have been out for longer than a year to transfer anything but the first twelve months of the rental's principal (because after that the item might be in bad condition), you can set the number of payments to 12. Those 12 months will transfer over to the new item, but subsequent months the renter might have paid will not. With the Entire Contract option, no time frame is given, and the Transfer Amount would be fixed at whatever percentage of the principal you want.
- Edit Exchange Profile - You can click the Pencil icon or the profile title to edit the terms.
- Require Maintenance / Protection - Enabling this setting will require whichever of the Maintenance or Protection fees you have set up as a default whenever a customer signs up for Online Rentals.
- Credit Card Autobilling - Turn this ON if you wish the system to auto-bill a card after a payment fails.
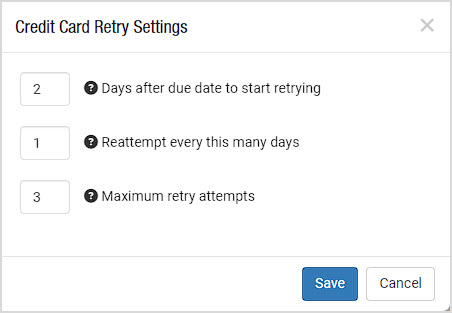
- Configure Autobilling - You can set the duration in days the system will wait after a failed payment to retry the charge with the Days After Due Date to Start Retrying setting. Please note that successive charges that fail will NOT trigger a late fee again; each main payment date that is missed will charge a late fee, so this setting will just retry the charge for you to see if it will go through. Setting this to be a shorter duration than the number of days of grace you offer on late fees can be a very good thing. Next, you will set the period in days that will pass in-between retry attempts with the Reattempt Every This Many Days setting. And lastly, you can set the number of Maximum Retry Attempts the system will make before it stops trying.
Notices
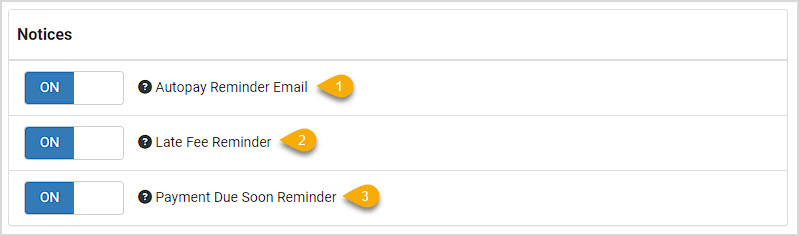
- Autopay Notices - If you wish for the system to send email notifications about Autopay to your customers, you can set this toggle to ON. Autopay reminders are sent out 5 days prior to the day the payment is scheduled.
- Late Fee Notices - If you wish for the system to send email notifications of Late Fees to your customers, you can set this toggle to ON. Late Fee reminders are emailed as soon as the fee is incurred.
- Payment Due Soon Reminder - Enabling this setting will email customers about upcoming payments with a link that will allow them to pay online.
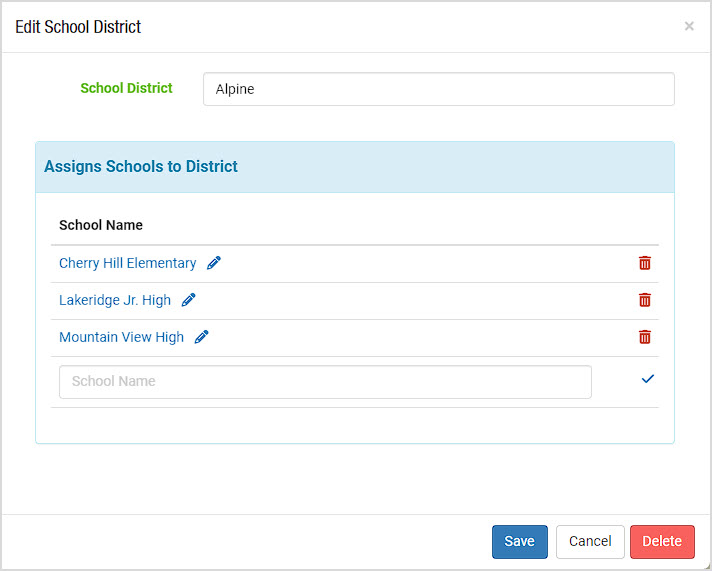
Schools
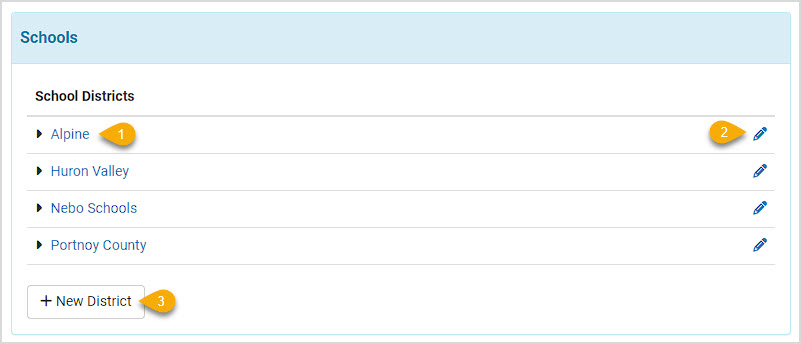
- School Districts - If you do rental service to school districts, you can set up your different districts in this area, with all schools listed within each district.
- Edit Schools / Districts- You can click the District name or the Pencil icon on the right to edit saved Districts and Schools. You can click the Arrow next to the District name to expand and view all saved Schools in the district.
- Create District / Schools - To create a new district, click the +New District button and enter the name for the school district. You can then enter individual school names you provide rentals for, and there is no limit to how many you can enter. Once you're finished, click to Save the entry.
After you've saved the School District info, whenever you create a new Rental Contract, you will have the option of adding a Teacher, School District, and School for reference to the contract.
Rental Contract Profiles
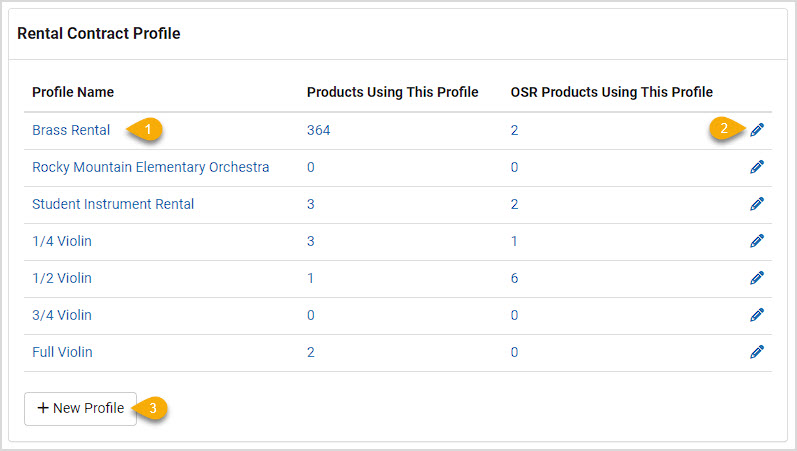
- Rental Contract Profiles - For groups of items that will use the same terms on your Rental Contracts, you can save Rental Contract Profiles and assign them to individual products. Each line item contains the Profile Name, the number of regular system Products Using This Profile, and the number of OSR Products Using This Profile (these would be the 'virtual' products for Online School Rentals). You can click the numbers for either column to see a list of all products set with the profile.
- Edit Profiles - Click the Profile Name or the Pencil icon to open and edit any of your saved profiles.
- Create New Contract Profile - Using the +New Profile button, you can create preset profiles for common terms you use in RTO/RTR contracts in different situations. Here are the items you can set for any Profiles you create (please note you have drop-lists for your available tax rates if you need them for Monthly Maintenance and Monthly Protection items):

Depreciation
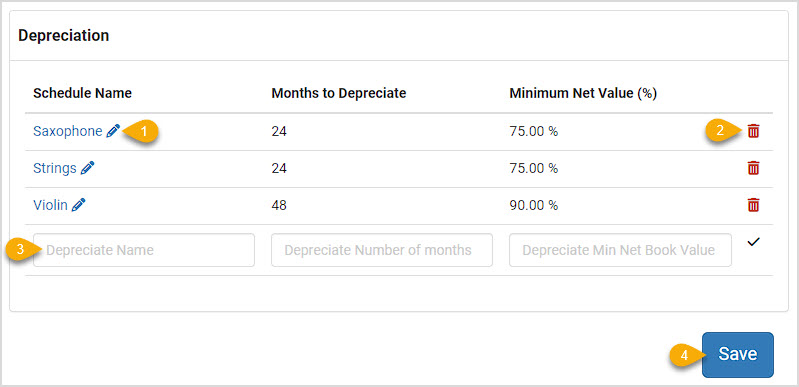
- Depreciation Schedule - You can track your Depreciation cost changes based on the different kinds of Rental Contracts you do. For schedules you've saved, you can click the Name or the Edit button to adjust text or terms.
- Delete Schedule - If you will no longer need a Depreciation Schedule, you can click the trash can icon to delete it. Please note that any items using that schedule will no longer have a Depreciation Schedule assigned.
- Create Schedule - You can create as many schedules as you might need. If you typically do RTO contracts for student instruments for a school year, you could enter the Depreciation Name of the contract type, the number of Months to Depreciate. You will also set the Minimum Net Value of the item as a percentage of it's new Cost value, and this sets the total Cost of the item below which it cannot depreciate. For example, if you have a $500 new trumpet and it will always be worth at least $50 no matter how old it gets, set the Minimum Net Value at 10%, and the depreciation schedule the system creates will not allow the item to depreciate below that. Another way you can use this is if you have shorter contracts, you can set the Minimum Net Value to what you know the item's value will be, as a percentage of its original new value, once the contract is complete.
Once you have made your configuration preferences, click the Save button at the bottom to set them in the system.
Steps for Attaching a Special Order to a Purchase Order Go to Modules > Special Orders, and make
The Music Shop 360 Rental Contract system sends up to four different emails out to contract-holders.
Your Calendar module will use the same typeface that is your default for your website headings and b
Is this page helpful?
×Help us improve our articles