featuredQuery - &category_rank=featured_content&section_1_brand__in=music_shop_360&categories__in=190209692542&orderBy=article_name Appraisals
Classes
Custom Form Styles - Customize Your Documents
Invoices for Billing Your Customers
Layaways
Paused Transactions and Quotes
Product Subscriptions
Rental Contracts
Trial Purchases
Website Settings: Calendar & Classes
Work Orders
Working with Special Orders

Modules

Featured Articles
Working With the Appraisals Module Despite the name, Appraisals can be used for any type of valuatio
The Classes module is a powerful and flexible way to present your classes or other recurring events
The Form Styles module allows you to customize different types of documents you print from the syste
You can view invoices for each of your customers who has a balance by logging into the system and go
Layaways can be created from the blue Admin Toolbar at the top of the screen in Modules > Layaway
Suspend a Transaction There are two ways in Music Shop 360 to save a transaction you've created: the
You can create periodic subscription programs of any length with products you have created already b
You can begin setting up a Rental Contract by clicking on the Register Button or you can use the +Cr
You are able to allow your customers to 'try out' an item for whatever period of time you like using
The Website Settings Tab: Classes & Calendar You can get to this part of the system by clicking
Understanding the Work Order Process You can get to this part of the system by hovering over Modules
How to Process Special Orders You can create Special Orders by going to your Register by either clic

All Modules Articles

Helpful Blogs

Take a look at some creative ways to level up what you do.
How To Start a Boutique Retail Store: 6-Step Guide

Lorem ipsum dolor sit amet, consectetur adipiscing elit. Ut et massa mi.

image - 2025-04-28T114828.689
How To Start a Boutique Retail Store: 6-Step Guide

Lorem ipsum dolor sit amet, consectetur adipiscing elit. Ut et massa mi.

image - 2025-04-28T114835.188
How To Start a Boutique Retail Store: 6-Step Guide

Lorem ipsum dolor sit amet, consectetur adipiscing elit. Ut et massa mi.

Online School Rentals 1: Schools

Online School Rentals 1: Schools

Our new version of online rentals is focused on renting instruments to students, so it's called Online School Rentals. Once it is active in your system, you can find it under Modules > Online School Rentals.


The Schools Tab

If you have already set up your school districts and schools, you will see a list of schools when you load the page. If not, these are set up under Settings > POS Settings > Rental Contracts, about half way down the page in the Schools section.

If you need to set up schools, you can click the link in the upper right of the Online School Rentals page to Manage Schools and Districts and you will automatically be taken to the area you need.

The Schools page has the following features: You can Search for a school you need to work with if you have a long list. You can also filter using the drop-lists at the top for Schools or Districts.

For each school, you will be building the rentals you plan to offer, and for each school, when they're ready you can Publish those rentals so they're visible and accessible on the website. By default, all schools will start with their rentals in an Unpublished status. You can use the Status filter at the top of the page to view published, unpublished, or all statuses.


Manage School Rentals

You can click to Manage Rentals for any schools in your list and you'll be able to view rentals you've set up for that school and edit them if needed.

Information about the school is at the top, and at first, the rentals for the school will be Unpublished. When you're ready to publish them, you will turn them on from here.

If you plan to deliver rental items to the school, you will want to make sure you enter its street address or that option will not be available at checkout for your customers.

Each rental you create for the school is listed here. While you can create them from here, it is more efficient to create similar school rentals and apply them to all the schools that will use them at once, and you can do that in the Rental Builder area, which we'll be showing you later in this series.

The instrument for the rental is pictured and named in the list, as is the Price and interval fees are charged. You can also see if Add-On items have been added for the rental, according to the school's specification on things like music books and required or recommended accessories. You can click on the Add-Ons link or go to the Action menu on the right to Edit the rental and adjust Add-Ons and other options.

We'll be going into more detail on how all of this is put together in later steps, but here is what the Edit Rental window looks like:

Go to Part 2: Categories

Complete a Layaway

Steps for Completing a Layaway in the Register

Please note that you can also access any Layaway from Modules > Layaways.

  1. Go to the Register, you can click the Register Button in the upper left.
  2. Search for the Customer.
  3. Click any of the icons in the upper right, the Customer Actions panel will open. NOTE: If the customer has an active layaway, the open box icon will be highlighted in gold.

Customer Actions layaway.png

  1. Scroll down to Layaways in the left column and find the one the customer is picking up.
  2. Click the Pick Up button.
  3. The payment will load as a line item in the register. Fees, such as a late fee, will display as separate line items. Adjust fees and amounts as needed.
  4. Complete your transaction in the normal way.

Click here for more detail on working with layaways: Layaways.


Complete a Special Order

Steps for Completing a Special Order in the Register

  1. Go to the Register, you can click the Register icon in the upper left.
  2. Search for the Customer.
  3. Click any of the icons in the upper right, the Customer Actions panel will open. NOTE: If the customer has an active special order, the ticket icon will be highlighted in gold.

    Customer Actions special orders.png

  4. Scroll down to Special Orders in the left column.
  5. Find the Special Order the customer is picking up.


  6. Click the Pick Up button, your special order will load as a line item.
  7. Complete your transaction in the normal way.

Click here for more detail on working with Special Orders: Working with Special Orders.

Complete a Work Order from the Register

Steps for Completing a Work Order from the Register

  1. Click the Register icon in the upper left.
  2. Search for the Customer and click the name to add the Customer to the Register.
  3. If the Customer has active Work Orders in the system, you will see the Wrench icon highlighted in gold in the upper right, with the other Customer Action icons.
  4. Click any of the Customer Action icons in the upper right of the Register.

Customer Actions.png

  1. The Customer Actions panel will open, and the Work Order(s) are listed at the bottom of the left column. Click the Work Order to load it into the Register.

  1. You will see line items for each service and part, and you can apply any discounts you might need.
  2. Complete the transaction in the normal way.

Click here for more detail on processing your Work Orders: New Version of Work Orders.


Compliance Update to System Autopay Emails

To remain federally compliant with regulations governing autopay billing for recurring charges to credit cards on file we have updated the emails the system sends out for areas that apply, such as those for Subscriptions and Rental Contracts. In each of these areas, the system sends out an email regarding the recurring billing when the feature is initially started for the customer, and then also sends out a notification email each time a payment is made.


Subscription Email Updates

Here is an example email of what the system will send out whenever a customer starts a new Subscription:

We are required to show the terms of the automated billing, such as how much each payment and estimated tax will be, when the first payment will start, and for how many payments the subscription will run. We also show at what frequency payments will be charged, and the basic payment info for the card being used (card type and last 4 digits). Finally, the footer contains essential info and in the bottom paragraph, we are required by law to provide a link the customer can use if they want to opt out of the subscription, or info for contacting the store. Please note that just providing contact info is not enough for this requirement, the link must be present.

For each payment that is charged to the customer's card for the Subscription, we will send an email like the one below, which contains similar content also required to be compliant.


Rental Contract Email Updates

Since Rental Contracts also use recurring billing, we have updated the system notices for that area as well. Here is an example of an email a customer will get when they start a new Rental Contract:

For this area as well, we are required to show the terms of the automated billing, such as how much each payment and estimated tax will be, what fees will be charged if there are any, when the next payment will be, and for how many payments the contract is scheduled to run. We also show at what frequency payments will be charged, and the basic payment info for the card being used (card type and last 4 digits). The footer contains essential info and in the bottom paragraph the customer can see info for contacting the store if they have questions about their contract. Since it is a contract, we are not required by law to provide a link that can cancel the automated payments.

For each payment that is charged to the customer's card for the Rental Contract, we will send an email like the one below, which contains similar content also required to be compliant.

Create Short-Term Rental Products, Accessories, and Packages

To work with Rental Items and Packages, go to Modules > Rental Admin, and in the list on the left, click on the Rental Category for the Items and/or Packages.

rt 01.jpg

It is recommended that you read the Rental Settings article before proceeding.


Adding a New Rental Item

  1. Go to Modules > Rental Admin.
  2. Click either the white +Item button or the white +Package button. Both will take you to the same page and you can switch between either by changing the Item Type at the top right-hand corner. Please note, this is a two-step process, meaning you’ll add the items, then go back into them to enter inventory, edit categories, and input further details. Additionally, you can create items by selecting a category and adding the item with the +Item button. This will add the product directly to the appropriate category.
  3. Enter the Title – The item's name, ideally the same way the manufacturer writes it.
  4. Select the Item Type – Here are the different item types you can create:
    • Standalone: Single items (wetsuits, skis, mountain bikes, longarm sewing machines, etc.)
    • Package: These are bundled items (a diving package w/ goggles, regulator, and a scuba tank, full skiing set, or a classroom with a TV, sewing machine, etc.)
    • Accessory: Sort of like Suggested Items with a particular product. For example, if you rent a bike, you may also want to rent a helmet, or if you're renting skis, you may also want goggles. These can be added to items and packages after they’ve been created.
  5. Add the Option Group, if applicable * – This associates the necessary options with what the item requires for adding rental inventory. For example when you set up the Item Options (see Setting up Rentals), they may have included size options (sm, md, lg). When you set an Option Group for a product, you will add inventory to the option (i.e. size, color, style, etc.) during the item creation process.
  6. Track Item Details* – If the items being entered have specific ID number(s), this should be checked. However please note: this field cannot be changed after it is saved. If you don't check this box, the inventory will be added as pooled items, which means the system will not keep track of specific items and sell them simply as inventory. Tracked items will associate a specific item Id to the customer it was sold to.
  7. Add a Description – A brief description of the item or package. Used for Website and SEO, so be sure to have your major keywords in the description.
  8. Set the Deposit Amount – The security deposit amount that you will hold. Please note, this should be entered without any special characters, which means a deposit of $13.00 should be entered as 13.00
  9. Set Categories – Check the boxes you want this item to appear in.

*These fields do not apply to new packages.

rt 02.jpg


Entering Item Details

Once an item has been entered and saved, it can be found by going to the Category you assigned it to. Clicking on one of the categories to the left will show you all the items within it. You’ll notice there are columns that list the basic details for each item, including: the Name, Type (item, package, or accessory), Options, Inventory, Deposit amount, Accessories, and Renter Details count (the number of details required of a renter in order to rent the item).

2017-01-25_15h47_19.png

If an item is missing its price or if a package is missing items there will be a small warning in orange that will notify you.

orange warning.png

The green camera icon (not pictured: you will see it if you haven't yet entered an image for the item) indicates there are no images associated with the item. You can add images to an item by clicking on the item and adding the image in the Images tab. The images will be scaled automatically and you can select the default thumbnail image by pressing the small image icon in the top left of the uploaded image. The icon in the bottom left corner of the uploaded image allows you to enter a caption when you click it. You can remove images at any time by pressing the garbage can icon in the top right corner. You can add up to four images to any single rental item.

rt 03.jpg

Clicking on an item will allow you to enter or edit its details. Some of the fields will display product details from the information you originally added, but some new fields will be added in this area. Below is a full list of each tab that will need to be filled out.

Images – Follow the instructions provided in the Images tab to upload a picture of your rental item. The image(s) be displayed in the POS Register.

Categories – This should be pre-populated with what you entered when you created the item, but if you want to change the available categories, you can check or un-check them here. Please note, you may add items to multiple categories.

Inventory – To add inventory quantities, press the small green arrow in the right-hand corner. A new window will appear asking for the location to which you are adding inventory (for multi-store locations). Select an item option if applicable, and a Hold inventory amount. This inventory is reserved as backup inventory and will not be available to rent via the Web. It’s designed for in-store rentals only so as to prevent over-renting an item in the rare case of a physical shortage due to damage, theft, or missing inventory.

rt 04.jpg

To add additional inventory, press the white + Add button. With pooled items (items that are not tracked specifically, instead simply tracked by inventory amount) a new line will appear asking for the quantity to add and the cost per item. After you enter these fields, press the green Save button at the bottom. The records will be saved and you can edit them manually at any point, though we don’t recommend it. Tracked inventory items are the same, except that you have the option of adding a serial number, unique ID label, manufacturer, model, and cost. Please note, that the system will search by serial number, unique label, or item title.

rt 05.jpg

Renter Options – These come from the Renter Options you created in the Settings and you can add these details wherever applicable. For example, ski rentals may need renter age, height, foot size, etc.

Package Items – This only applies to packages, not standalone items or accessories. – Press the blue + sign to add the items you want to be in this package.

Prices – To enter your renting prices for this item, click the white Manage Prices button. A panel will slide out showing you fields for each day of the week. The Initial Price column is for an optional rental fee. For example, you may charge a standard $50 for all rentals, and then an additional $10/day. If no initial price is needed, then it should be left blank. The Time Periods that you entered in the Settings will display automatically, and you can remove them for an item by pressing the red X button. To add removed Time Periods back, you must navigate out of the page and back in again and you’ll see a green + button you can press. To clear the times you’ve entered, press the red circle with the line through it. You may also notice after the Monday column there is a green arrow icon pointing forward. Pressing that will populate all the other days with whatever you entered for Monday. When you're finished, press the green Save button.

Please note: To have a day NOT charge the customer, Sunday for example, set the Duration Price field to 0.00 for that day. If the 0.00 is not in place, the system will count the day in question as another day of rent at the same price as the previous day.

What's the difference between Days (24 Hours) and Daily?

Selecting the Time Period of Days (24 Hours) sets a pricing rate that will apply to whatever day the rental is started, and different rates could be set for different days, as in the example above. In this kind of Time Period, it applies to the 24-hour period that starts on the beginning day of the rental and ends the same time the next day.

Selecting the Time Period Daily sets a single rate that would apply to any single day, but if the rental goes into the next day, a second Daily rate would be applied to the rental.


Customizing Work Order Text Messaging

The work order text messaging feature allows users to customize text messages sent to customers regarding their work orders. This includes customizing the default message sent when orders are ready for pickup as well as customizing the signature appended to messages for each store location, if you have multiple stores.


Customize Your Text Signatures

  1. Click the Admin Button with your username in the upper right and go to Settings > POS Settings > Work Orders.

  2. Scroll down to the Signature section.

  3. Click the dropdown and choose Custom Signature.

    • Enter the custom signature you want in the field to the right.
    • Click Save at the bottom.


Ready for Pickup Notification

In the same area of Settings, you can configure the default message content that will be sent whenever a Work Order is ready to be picked up. In the section for Default Message for Notifying Customer, the system default message will be in place. You can edit the content, and if you want, you can add automated merging of the Customer's first name and the Work Order ID, as pictured below. Once you're done configuring the message, click to Save.

Please note, if you have also customized the signatures as described above, the text message notifications will have those custom signatures so the customer will know which location to go to.

In the Work Order, you will see the message when the system prompts you to notify the customer about pickup.

When you change the Status of a Work Order to Ready for Pickup and click to Save the Work Order, a window appears with a text message box and signature.

The Message Content will populate the default message you have saved in the settings, as described above, and will also include your customized signature, as pictured below.


How do I set my From email address for emails the system sends out?

After logging into the system, in the upper right click on the Admin Button with your username and go to Settings > Website Settings > Website Settings > Email, and you will see a field to enter your From Email Address. Please note the warning on the page about not using an email address provided by one of the big free email providers, such as AOL, Hotmail, Gmail, Yahoo, etc. The reason such email addresses will not work for this system is because that spammers use email addresses like that to send bulk emails out at little risk to themselves. So bulk email provider services have trouble sending messages with From email addresses like that, so in the system, we do not allow them.


How Rental Contracts Send Emails

We send four emails. Three of which can be controlled by the toggles in the Settings > POS Settings > Rental Contracts area. The first one is the one that cannot be controlled by a toggle. We just automatically send it:

  1. Autopay Receipt - This is the receipt that sends to the customer when a payment is made via autopay. There is no way for the store to turn this off. Subject - Your recent auto-payment from . Body - It is just the receipt from the till like other till transactions where the receipt is emailed.
  2. Autopay Reminder Email - This is sent 5 days before the autopay is due. It is reminding the customer that their card will be automatically charged.

Subject - Your payment to is due soon.

Here is an example of what the email body looks like:

Image 2020-03-02 at 3.27.49 PM.png

  1. Late Fee Reminder - This is sent whenever the contract incurs a late fee.

Subject - Rental payment is late -

Here is an example of what the email body looks like:

Image 2020-03-02 at 3.25.49 PM.png 

  1. Payment Due Soon Reminder - This is sent 5 days before the payment is due to anyone who does not have Autopay enabled.

Subject - Your payment to is due soon.

Here is an example of what the email body looks like:

Image 2020-03-02 at 3.24.59 PM.png


How to Create a Link to a File

Create a Link to a File

1442439823_open-file.png

These steps will help you create a text or image link to a file hosted on our servers for your site. Our system will allow you to upload the following file types: Documents / Productivity - CSV, DOC, DOCX, PDF, PPT, PPTX, RTF, TXT, XLS, XLSX. Images - BMP, GIF, JPG, PNG. Audio - MP3, WAV. Video - AVI, FLV, MOV, MPG, MP4, QT, SWF, WMV. Compressed Files - ZIP.

  1. After logging into the system, click Website > Website Editor and go to the page where you want to create the link.
  2. Either create a new module for the link (click on the Add Body Content link at the top and click the Add button for the Content module at the top of the list) or click the Edit button (the fat little pencil) in the gray toolbar of an existing module where you want to create the link.
  3. If you are adding a link to an image, click on it to highlight it. If you are making a text link, type out your text and then highlight it with your mouse. (Example: Click here to view our Summer Catalog!)
  4. Click on the Insert/Edit Link button (in the functions above the Content editing box, in the top row of buttons: this button looks like three chain links).
  5. Click on the Browse Server button (the button on the far right of the Source field; it looks like a folder with a magnifying glass).
  6. If you have already uploaded the file, click on the folder it is in and find it in the list (or Search for it in the upper right) and then click on the file. If you have not uploaded the file yet, do the following steps:
    • Click on the blue Upload File button.
    • Click on the green Add Files button and search your computer for the file you want.
    • Either double-click on the file or click on it once and then click the Open button.
    • You will see a small thumbnail image of your file in the Upload Files window. Click on the blue Start Upload button.
    • Depending on the size of the file you are uploading and the speed of your connection, you may see a status bar for the upload. Once the file has finished uploading, the Upload Files window will disappear.
    • You will see your file at the top of the list. Click on it.
  7. You will see the URL for the file inserted into the URL field for the link. Click on the drop-list arrow for Target and then click on New Window (blank). The reason you will want the file to download in a new window is because in many cases a browser will take your visitor away from your site to load the file in the window. By having it load in a new window your visitor can download the file, and when they are done, they can close that window and they will be right back at your site.
  8. Click OK.
  9. Scroll down to the bottom of the screen and click the Save button.
  10. Test your new link to verify that it works correctly.
How to Create Links to Pages, Files, and Email Addresses

Create a Link to a Page on Your Site

1442429099_page.png

These steps will help you create a text or image link to a page on your site. For these steps, the page must appear in your All Pages list, so this kind of linking will not work if you need to link to one of your products, classes, events, or news items. Please see below for instructions on how to link to dynamic module pages.

  1. Go to Website > Website Editor and go to the page where you want to create the link.
  2. If you are creating a new module for the link: Click Add Body Content and click the Add button for the Content module at the top of the list. If you are adding the link to an existing module: Click the Edit button (the fat little pencil) in the gray toolbar of an existing module where you want to create the link.
  3. If you are adding a link to an imageclick on it to highlight it. If you are making a text linktype out your text and then highlight it with your mouse. (Example: Click here to see our best deals in our Huge Sale!)
  4. Click on the Insert/Edit Link button (in the functions above the Content editing box, in the top row of buttons: this button looks like chain links).
  5. Click on the Browse Server button (the button on the far right of the Source field; it looks like a folder with a magnifying glass).
  6. In the upper left click on Pages and then find the page you are linking to in the list and click on it. Please remember that links to unpublished pages will not work until you publish the page. Also, if you don't find the page in the list, it may have been moved to a sub-folder of pages on the left (you may need to click on the little triangle next to the folder to see the sub-folders). If you cannot find the page in any of the folders, it is most likely a dynamically generated module page (e.g. a product, category, event, news item, etc.). If that is the case, please follow the instructions on Creating a Link to a Dynamic Module Page below.
  7. In the Link Properties window click OK.
  8. Scroll to the bottom of the screen and click the Save button.
  9. Test your new link to verify that it works correctly.


Create a Link to a File

1442439823_open-file.png

These steps will help you create a text or image link to a file hosted on our servers for your site. Our system will allow you to upload the following file types: Documents / Productivity - CSV, DOC, DOCX, PDF, PPT, PPTX, RTF, TXT, XLS, XLSX.  Images - GIF, JPG, PNG, SVG. Audio - MP3, WAV.  Video - AVI, FLV, MOV, MPG, MP4, QT, SWF, WMV.  Compressed Files - ZIP.

  1. Go to Website > Website Editor and go to the page where you want to create the link.

  2. If you are creating a new module for the link: Click Add Body Content and click the Add button for the Content module at the top of the list. If you are adding the link to an existing module: click the Edit button (the fat little pencil) in the gray toolbar of an existing module where you want to create the link.

  3. If you are adding a link to an image: click on it to highlight itIf you are making a text linktype out your text and then highlight it with your mouse. (Example: Click here to view our Summer Catalog!)

  4. Click on the Insert/Edit Link button (in the functions above the Content editing box, in the top row of buttons: this button looks like three chain links).

  5. Click on the Browse Server button (the button on the far right of the Source field; it looks like a folder with a magnifying glass).

  6. If you have already uploaded the file: click on the folder it is in and find it in the list (or Search for it in the upper right) and then click on the file.

    If you have not uploaded the file yet, do the following steps:

    • Click on the blue Upload File button.
    • Click on the green Add Files button and search your computer for the file you want.
    • Either double-click on the file or click on it once and then click the Open button.
    • You will see a small thumbnail image of your file in the Upload Files window. Click on the blue Start Upload button.
    • Depending on the size of the file you are uploading and the speed of your connection, you may see a status bar for the upload. Once the file has finished uploading, the Upload Files window will disappear.
    • You will see your file at the top of the list. Click on the file.
  7. You will see the URL for the file inserted into the URL field for the link. Click on the drop-list arrow for Target and then click on New Window (blank). The reason you will want the file to download in a new window is because in many cases a browser will take your visitor away from your site to load the file in the window. By having it load in a new window your visitor can download the file, and when they are done, they can close that window and they will be right back at your site.

  8. Click OK.

  9. Scroll down to the bottom of the screen and click the Save button.

  10. Test your new link to verify that it works correctly.


Create a Link to an External Page or to a Dynamic Module Page

1442440698_applications-internet.png

These steps will help you create a text or image link to an External Page (a page that is not on your website) or to a Dynamic Module Page (these are pages that are generated by the system: for example, if you look at your Calendar and click on View Entire Calendar, the system takes you to a dynamic page for the current month based on the information you've put into the system). Dynamic Module Pages include Categories and Products in your online store, Categories and Events in your Calendar, Categories and Classes in your Classes module, and individual items in the following modules: FAQ, Job Listings, News, and Newsletter Archive. It is also possible to link to a specific search that you do in your Search module, and those results are also dynamically generated.

  1. Go to Website > Website Editor and go to the page where you want to create the link.

  2. If you are linking to an external web page: open a new tab or window in your browser and go to the page that will be the end destination of the link you are making. Highlight and copy the web page URL.

    If you are linking to a Dynamic Module Page: go to the page that will be the end destination of the link you are making. Highlight and copy the web page URL. IMPORTANT: If your website is not live yet and/or if you are still logging in with the mywebsite.rainadmin.com/admin address, you should copy everything after the .com, so the part of the link you will copy will start with the / after the .com and will look like this: /shop/shoes/nike-streak.htm

  3. After you have copied the URL, go to the page on your site where you want to create the link.

  4. If you are creating a new module for the link: Click Add Body Content and click the Add button for the Content module at the top of the list.

    If you are adding the link to an existing module: Click the Edit button (the fat little pencil) in the gray toolbar of an existing module where you want to create the link.

  5. If you are adding a link to an image: Click on it to highlight it.

    If you are making a text link: Type out your text and then highlight it with your mouse. (Example: Click here to go the Nike website.)

  6. Click on the Insert/Edit Link button (in the functions above the Content editing box, in the top row of buttons: this button looks like three chain links).

  7. Paste the web address you copied into the URL field. NOTE: If you are linking to an External Page, you need to also do the following:

    • Click on the drop-list arrow for Target and then click on New Window (blank). The reason you will want the external page to open in a new window is because the browser will take your visitor away from your site. By having it open in a new window, your visitor can view the page and when they are done, they can close that window and they will be right back at your site.
  8. In the Link Properties window click OK.

  9. Scroll to the bottom of the screen and click the Save button.

  10. Test your new link to verify that it works correctly.


Create a Link to an Email Address

1442445310_email_open.png

These steps will help you create a text or image link to an email address. This kind of link will open your visitor's default email program on their computer. In some cases your visitor might not use such software at all, preferring instead to use browser-based email such as Yahoo Mail or Gmail. If they don't have email software they use, their system will open a default program that may not even be set up for them yet, so it is a good idea to make sure that the link you create to your email address also shows the text of the email address. Please follow the steps and see the example below:

  1. Go to Website > Website Editor and go to the page where you want to create the link.

  2. If you are creating a new module for the link: Click Add Body Content and click the Add button for the Content module at the top of the list.

    If you are using an existing module: Click the Edit button (the fat little pencil) in the gray toolbar of an existing module where you want to create the link.

  3. If you are adding a link to an image: Click on it to highlight it.

    If you are making a text link: Type out your text and then highlight it with your mouse. (Example: Email us at info@outdoor24-7.com!)

  4. Click on the Insert/Edit Link button (in the functions above the Content editing box, in the top row of buttons: this button looks like three chain links).

  5. In the URL field, enter the following: mailto:

  6. Enter the email address the link will be sending to, e.g. mailto: info@outdoor24-7.com (please note there are no spaces in the URL field)

  7. Click the Target drop-list and then click on New Window. You will want this function in case they are using web mail, so it won't take them away from your site; it will open their web mail in a new tab.

  8. Click OK.

  9. Scroll to the bottom of the screen and click the Save button.

  10. Test your new link to verify that it works correctly.


Another type of link is an Anchor link, which will basically jump to a certain part of a page. If you want to learn more about Anchor links, click here: Link to Page Sections with Anchor Links.

I don't see the option to add Wait Lists for my Classes, how do I add that?

Once you have logged into the system as an Administrator, in the upper right you'll see the Admin Button with your username. In the drop-list, click on Settings > Website Settings, and in the first tab that comes up (Calendar & Classes), scroll down to the second section and you can check the box for Add to Waitlist in the area for Class settings. Be sure to click Save at the bottom if you made any changes.

Once you have enabled that option, in each class in the Pricing tab you will have the ability to activate a Wait List for the class. Any students that add their names to the Wait List for classes that are fully booked will appear under Reports > Wait Lists.


Online School Rentals 2: Categories

Our new version of online rentals is focused on renting instruments to students, so it's called Online School Rentals. Once it is active in your system, you can find it under Modules > Online School Rentals.

osr 1-01.jpg


The Categories Tab

Online School Rentals does not use your regular website product Categories; you will need to create the categories you plan to use for rentals here. You can structure these categories by instrument, if you like, or some stores might start with the different music classes, as in the example below. For simplicity, we recommend your top-level categories be set up by instrument type, e.g. Brass, Woodwind, etc., and then broken out further below that. If you work with a lot of schools and different classes use different music books for the same instrument, you might start with something similar to what you see below. For example, if a Marching Band instructor is using a specific book for their class, and the Band instructor is using a different one and needs slightly different accessories, it might be wise to have categories under each of those headings for instruments that are in both bands, like tubas or or trumpets.

The video above explores different cases for setting up different ways, but you should plan your category strategy according to the needs of your schools.

osr 2-01.jpg

You can use the +Add Top Level Category button at the top to create your initial Categories. The Action menu on the right side of each will allow you to edit the title of the category or the image, or you can add Subcategories. If a category needs to be deleted, any rentals associated with it will just no longer have that category selected.

When you create a top level category or subcategory you'll see this window:

osr 2-02.jpg

You can and should upload an image for each category you create. The images won't need to be large, they don't display any bigger than about 500 pixels wide on the web page.

Please note that only categories that have Published rentals in them will display on your website, and nothing will display until you set up that side of your Online School Rentals, so you can explore this and practice without having to worry about anyone seeing it until you are ready.


Organizing Your Categories

You can organize your rental item categories however you like. It is recommended to have your top level be the major instrument types (e.g. Brass, Bowed Strings, Guitars, Woodwinds, etc.) and work your way down from there.

Categories will display only if the school the renter goes to has rental 'packages' saved and published for that category, so you can build your categories using class and even teacher names, if you like, but the above method will be less work for you.

Go to Part 3: Rental Products

Online School Rentals 3: Rental Products

Our new version of online rentals is focused on renting instruments to students, so it's called Online School Rentals. Once it is active in your system, you can find it under Modules > Online School Rentals.

osr menu.jpg


The Rental Products Tab

We wanted this feature to be as flexible for your use as possible, so we have created a way for you to make 'virtual' rental products that don't have to be tied directly to physical products saved in the system. Why is that a good thing? This virtual product allows the customer to complete checkout on a rental and allows the rental contract to be created and does not have to assign a serial number until you are ready to do so.

In that way, if you have multiple locations, you are able to add items from any location, so whatever item you have on hand whenever you open and fulfill the rental contract can be assigned in this way.

You also have the option of having the Rental Product assign inventory serial numbers automatically from products you have created in the standard product area.

osr 3-2.jpg

You can click the +Create Rental Product button at the top to make a new item. For Rental Products you have created, you will see line items for each with key details, and you can click to Edit or Delete them on the right.


Creating Rental Products

When you create a Rental Product you'll see this window:

osr 3-3.jpg

Please Note: You do NOT have to recreate rental products here that you have already created in the normal Products module. If you use an already created product, you can just add that item in the Rental Builder in the next step linked below without having to do that work here. Understand that if you use a standard product, a serial number from that product will be assigned to each new contract that is created automatically. If you create a Rental Product from this area, it does not have to assign serial numbers until you are ready to do so.

Add the title for your item and a description. These will appear on the website when customers view the product. You will also need to select a Rental Contract Profile that you would want to use for the item. If you have not already done so, you will need to set up your contract profiles under Settings > POS Settings > Rent to Own. You won't be able to save a Rental Item until you have a Contract Profile to assign to it.

osr 3-4.jpg

You are able to add up to six images to a rental, if needed. The first one you add will be the primary image that is used on the category page where the customer will see the item and will be the main image that loads when the customer views the page that is just for the Rental Product. Your images should be either Jpeg or PNG and should be 2000 pixels or less in the largest dimension. File size should be less than 4mb.


Item Condition and Options

If you use serialized Conditions, such as Brand New, Excellent, Used, etc., for your rental items, you can check the box for that and you will see Condition Levels for each item Condition you have chosen in the Settings > POS Settings > Products area. You can set different purchase Price and Rental Price amounts for each condition level as needed.

osr 3-5.jpg

If the item has different Options for the same product, such as Sizes for a violin in the example below, you can check the box to set up Options and enter the Option Title (e.g. Size) and Option Values (e.g. 1/4 Violin). If your different options have different Purchase Prices and Rental Prices, you can enter those as well.

osr 3-6.jpg

If you are no longer carrying a certain Option, you can Deactivate it and it will no longer display as a rental option a customer can choose.

If a Rental Product you are creating has both Conditions and Options, the system will list out each Active Option with all Condition levels, as in this example, and pricing can be set differently for each Option.

osr 3-7.jpg


Products to Fulfill From

You are able to assign Products to Fulfill From, so if a certain Option for a Rental Product would come from a specific physical product you have saved in the system, you can search for that item and have the system draw inventory from it as it fulfills contracts for that item. This will assign a serial number from that product to the new contract automatically. You can list more than one item to fulfill from and the system will draw inventory from the first until it is out, then will draw from the second, and so on.

Go to Part 4: Rental Builder

Online School Rentals 4: Rental Builder

In this step you'll learn how to combine your rental items with any add-ons that might be needed and how you can associate these package deals with the schools that need them. You can find this tool under Modules > Online School Rentals.

osr menu.jpg


The Rental Builder Tab

Using the Rental Builder you can build 'packages' of rentals including the Rental Product and whatever accessories would go with it. You can assign it to one or more Categories, set which Add-On items would be Required and which would be optional, you can set shipping / pickup / delivery preference and assign the rental to whatever schools would use that specific package.

First, you'll select the Rental product by clicking Search in that area. Once you search for an item, matches will come up if you have created them as Rental Products in this module, and you'll also see matches in physical Products you have saved in the system.

If you set a standard Product as the Rental Item, the system will assign serial numbers as it creates the Rental Contracts. If you choose a Rental Product you created in this module, you will be able to assign inventory whenever you like from whatever store locations you might want to use. Click on an item result to select it.

osr 4-2.jpg

You will also need to set one or more Categories for the item from that drop-list.

osr 4-3.jpg


Add-On Items

You can search for any saved product in the system that is not serialized and use it as an Add-On item for the rental package. Add-Ons can be either Required or Optional, and none are actually required at checkout for the customer, so if they already have an item that's listed as a Required Add-On, they don't have to buy it when they are setting up the rental on your site.

Search for items for the rental package for each area and click on the result to save it. If there is only a single matching result, it will load the item automatically.

osr 4-4.jpg

After you select Add-Ons, you can choose what options you will offer for either Shipping, which functions the standard way with online orders. Store Pickup, which is also standard, and/or a new option for School Delivery if you deliver instruments and rental items to your schools. You can select all options you offer for certain rental configurations and choose different options for different schools, if needed.

osr 4-5.jpg


Assigning Rentals to Schools

You can search for or filter for the schools the rental you are building should be assigned to and check the box for each one, or as needed, you can Select All / Deselect all. Once you have selected the schools the rental package is for, the Assign Schools button will become active at the bottom and you can click it to save the rental to all of the selected schools.

osr 4-6.jpg


Working with Rentals

Your saved Rentals will be visible from the Schools tab by finding the school you want in the list and clicking the Manage Rentals link on the right. Once you have all the rentals you need for a school, from there you can click to Publish them and take them live on your website, after you have set up that end of the process.

Go to Part 5: Agreement Information


Online School Rentals 5: Agreement Information

In this step you will learn how you can configure information you'll need to collect from the customer before checkout. You can find this tool under Modules > Online School Rentals.

osr menu.jpg


The Agreement Information Tab

We created a way for you to capture essential information you need from the customer in order to start a rental contract with them. On this tab, the upper part of the list contains items that the regular shopping cart captures for you and adds to the Customer's account in your store, so you will already be capturing that info automatically.

osr 5-2.jpg

You can click the +Add Field button and the system will give you a list of premade fields you might choose such as Driver's License, Employer Company Name, etc. and you can click a selection to add it to the fields you will require a new renter to fill out before they can complete checkout. Fields you have chosen already will be grayed out in the Add Field window and will appear on the main page for this tab, as pictured here.

osr 5-3.jpg


Creating Custom Fields

If you need something that is not one of the premade selections, you can click Custom Field at the bottom of the list and you'll be able to create your own data field. First, enter the Title of the field, then choose which data type it will use, as pictured below.

osr 5-4.jpg

You can add as many fields as you need. When you do, each of your Customer accounts will have those fields in the lower area of the Details tab for the customer. So as new customers sign up for online rentals, this information will save to their Customer account for you, you will not see it in the rental contract itself.


Required Information Preview

At the bottom of this page is a preview of what the customer will see when they go through checkout for this area, as pictured here for the above example.

osr 5-5.jpg

Go to Part 6: Website Module


Online School Rentals 6: Website

Set Up Your Rentals Page

In this step we'll learn how to add the Online School Rentals module to a page of your website where your customers can start new rentals. Start by going to the Website part of the system, click on Website > Website Editor, or if you already have the page you need created, you can go to Website > Pages and click on it to open it in the Edit view.

If you need to create a new page for your online school rentals, you go to Website > Pages and create a new one from there, Please click here to learn more about that process.

Once you are viewing the page you want you'll see controls on the page for the content already there, much like pictured below, and you'll want to click +Add Content to add the new module to the page. The Add Body Content area will put it on the main part of the page, below whatever else is already there.

osr 7-1.jpg

Once you click to add content, you'll see a list of different modules you can add. Scroll down until you find the Online School Rentals module and click Add.

osr 7-2.jpg

You'll next see the configuration window for the module where you can set up the content customers will see and use to start the process.

osr 7-3.jpg

Here is how to configure your launch content:

  1. If you want, you can use a Heading above the content. If you have an image that doesn't really need a heading, just keep the Show Heading box un-checked. Otherwise, you can either use the default text or enter your own heading text.
  2. We start you out with a placeholder image, but if you have unique content, like a custom image using your style, or if you just want to write some text explaining what the customer can expect, whatever you have in this Body area, the entire area will be a clickable link that will let a customer start the rental. But you do need to have something in here or the module will not let you proceed.
  3. The page you are working with may not yet be published, so to learn how to publish the page when you're ready for it to be public, the upper link in this area will open a new window with the info you need. If you want to add a link to your main website navigation menu, you can learn how to do so by clicking the lower info link in this area.
  4. Once you click to Save, the content you created will be placed on the page.

The web page will load, and if you scroll down, you'll see your new module below any content that was already there.

osr 7-5.jpg

In the upper left of the new module is its Module Toolbar, and if you want it to be above other content in the Body area, you can click the Up arrow and it will jump up one spot. Continue this process until it's where you want on the page.


Taking It Live

When you have published your Rentals for at least one school, you are ready to take the page live that offers this first step in starting your online rental program. Go to Website > Pages, find the page that has the Online School Rentals module, and click the blue cloud icon to Publish it. In the same manner, if for whatever reason you need to take the page down from public view, the cloud icon will be gold and you can click it to Unpublish the page.

osr 7-6.jpg

You're all set! Now take a look at the steps your customers will go through in creating their rentals, and also order and inventory fulfillment in the final step in this series.

Next Step: Online School Rentals 7 Website Customer Flow and Inventory Fulfillment


Online School Rentals 7 Website Customer Flow and Inventory Fulfillment

Using the Online School Rentals module, your customers will be able to easily start a rental for a student through your website. Once they complete checkout, the transaction will appear in your Orders module, but before you complete Shipping, if any, you need to go to Modules > Rental Contracts and open the new contract.

You will be guided through the process of fulfilling inventory, as detailed further below.


Fulfilling New Contract Inventory

Got a truck full of instruments from five different store locations and you're at a school finalizing rentals? No problem, grab what you need and set the contract to the proper location as you go. Whether you're fulfilling the contract in the store and using inventory that's on hand or if you need to transfer an item from another store location, our fulfillment process will be able to give you the flexibility to use whatever inventory you need.

Please Note: Add-On items chosen in the web transaction will be listed in the Orders module and will need to be fulfilled from there. You will be choosing the rental instrument only in the fulfillment steps below.

When a new rental contract comes through, you will want to go into Modules > Rental Contracts and open it as soon as you're ready to choose which rental product you'll be using for the contract. The first thing you see when you open the contract will be a panel that will show you the rental item, some important details, and will let you set which store location you'll want to use for the contract (if you have multiple locations in the system).

osr 6-1.jpg

You'll see details about the order and about the Rental Item, and then if you have multiple Locations in the system, you'll be able to click on the one you want to use to service and support the rental contract.

osr 6-2.jpg

Next you'll search products saved in the system for the one you want to use for the rental. Here is what we have for you:

  1. Search Field - Search serialized products you have set up with Rental Contract Profiles. You can search by name, serial number, SKU, UPC, or Manufacturer Number. If you search by serial number, and if the system finds a match, you'll jump down to the step below.
  2. Item Details - If you click on the name of an item, a panel will open showing you details about the product.
  3. Quantity Available - Find any item for your current Location, even if it is 0 available, you will be able to set a TBD serial number. If you need to get a serial number from another Location, it will need to have inventory to transfer.

Click on the item's bar anywhere to select the item. If you clicked the wrong one, you can go back and choose again.

osr 6-3.jpg

You'll see the original Rental choice of the customer and the product you just selected. The monthly price will be set at whatever the Customer agreed to during checkout, even if the item you have chosen has a different price, so if you need to go back a step and choose something else, you can.

Below the item will be a list of available serial numbers. Click on the one you want. If you chose one that's from a different store location, the system will ask if you want to transfer the item to the location you chose for the contract earlier. The item must be in that location for the contract to finalize.

osr 6-4.jpg

Once you're finished, the contract will be ready to view. You'll see the pricing that the customer chose during checkout, the Autopay will be set up with the card the customer used. One are you might want to check is the Payment Due Date, which will by default be set for 30 days out. If you need the contract to start the next payment at a different date, you can set that here.

osr 6-5.jpg

As with any new contract, it is recommended to Print and/or Email the contract, depending on your process. Your final step will be to Save the active contract. Now you're all set!


Online School Rentals Simple Bulk Add / Edit Rental Packages

We have enhanced the Rental Builder tab to also be able to edit saved rentals. You are able to add new or edit existing rental packages in the Online School Rentals module in bulk. Here is the process in a nutshell:


Steps to Bulk Edit / Add Rental Packages

  1. Go to the Rental Builder tab and choose a Rental Product, at least one Category, and at least one School.

  1. The system will now find any saved rental packages for the item, categories, and schools you've selected that match, and it will also tell you if the configuration will add any new rental packages and how many.

  1. Configure whatever Payment Start Date, Add-Ons, and Shipping / Delivery / Pickup options you want for the selected schools / categories for the Rental Item.

  1. When you save by clicking Assign to Schools or Assign to Schools & Duplicate, all preferences for Payment Start Date, Add-Ons, and Shipping / Pickup / Delivery will be saved for the schools, replacing what was previously saved in existing rental packages. Please note that if you leave something blank, that will also replace whatever is saved, so you should configure the rental package as if building it from scratch before you save it.


Rental Contracts FAQ

Below are common scenarios and questions that we have encountered along with answers on how to solve the issues in the Rental Contracts system:


Question:

I have a student that is renting an instrument, and after 6 months they have grown and need to size up from the 1/2 size to the 3/4 size. What do I do?

Answer:

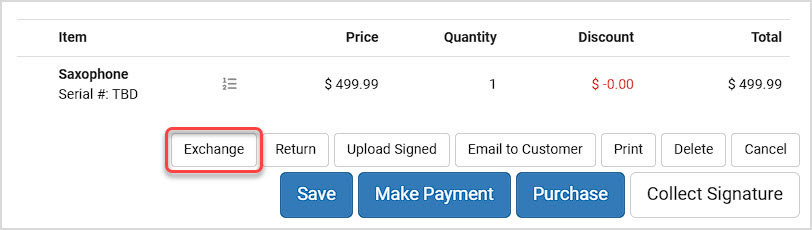
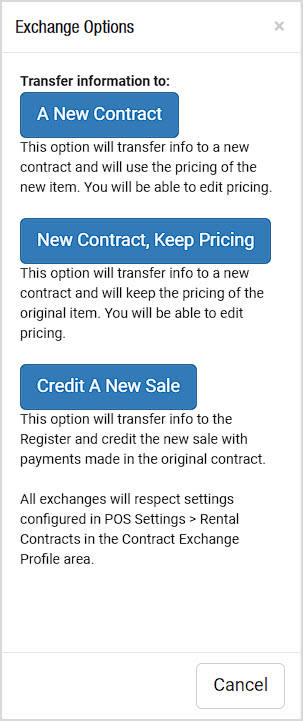
The way to handle this is through the Exchange option. Load the Customer into the Register, and in the Customer Actions in the upper right (the icons above the Date and Time) click to open the Customer Actions panel. Find the Rental Contract  and click to open it. You'll see the Exchange button at the bottom. After clicking the Exchange button, click to transfer to A New Rental Contract. You also have the option of preserving whatever pricing was used in the previous contract, if needed. Once you make your selection, the system will pull over the customer information and their rental credit (principal, down payment, and previously accrued credit) from the existing contract and will add it into a new contract. Please note, under Settings > POS Settings > Rental Contracts you can configure how much of what a customer has paid in a rental will go through as credit on a new one in the Contract Exchange Profiles area.


Question:

I have a student that is renting an instrument, and after 6 months they have grown and need the full size and they want to purchase it outright. What do I do?

Answer:

The way to handle this in our system is through the Exchange option. Open the Rental Contract in the Register, and at the bottom you'll see the Exchange button (see image above). After clicking the Exchange button, you would choose the option to transfer to Credit A New Sale.


Question:

A customer comes in and wants to make a lump sum payment. Will the scheduled payments be able to handle any odd payment amount?

Answer:

Yes. Let's say the customer's monthly payment is $40 and they come in and pay $100 in January. Their payment for January and February will show as completed. March will show a partial payment of $20. When March rolls around, they will owe the remaining $20.


Question:

The customer's payment with tax shows $25.50 on the Scheduled Payments calendar, but when I go to collect money in the Register, the payment with tax shows $26.13. Why are they different?

Answer:

The Scheduled Payments area is an estimate created at the time the payment schedule is created. The principal and fees will not change, because those are signed into contract. Tax rates can change and that is out of the store's hands. Our system will use the current tax rate in the Register and charge that as the tax. A recent change to the tax rate would be the reason things may not show up exactly the same. Tax changes do not happen frequently, so an issue like this is very rare.


Question:

If the tax changes, will the Scheduled Payments area be messed up by payments that are less or more because of tax?

Answer:

No, it will retain the same number of payments, frequency, and end date.


Question:

If the tax rate changes and a customer wants to know what their next payment amount will be, how can I find that information?

Answer:

In the Rental Contract you can see Next Payment Amount. When you click it, you will see a breakdown of everything that goes into the payment. You can open the contract either from the Register with the customer loaded, or from Modules > Rental Contracts and clicking on the contract number.


Question:

A student rents an instrument for 6 months and decides that they hate instrument lessons and they want to quit. Their parent comes to return the instrument and is not interested in getting a new instrument or recouping any of the credit. What do I do?

Answer:

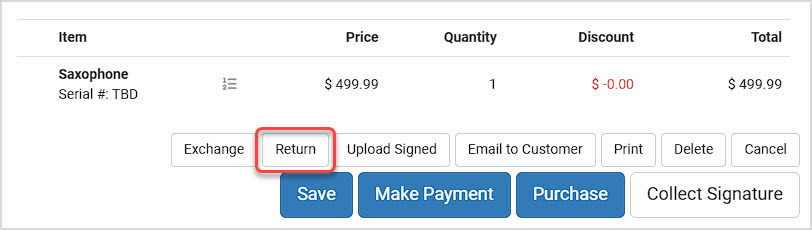
Choose the Return option at the bottom of the RTO contract. This will place the item back into inventory and close out the contract.


Question:

As the merchant, I still own all of the instruments that I am renting out. Where is that inventory stored during the rental?

Answer:

Our system takes the item from "In-stock" to "Reserved". That means it will still show as owned inventory on your books, but it won't show up as an option to rent or sell until it is returned. So when you look at the product's inventory, it may appear as if all of the items are in stock (but the On Hand quantity will be the number available to rent), but if you go to the Register to start a new Rental Contract, only items not already on contract will be visible to rent.


Question:

My customer believes there is a discrepancy with some payments. How can I verify actual payment information?

Answer:

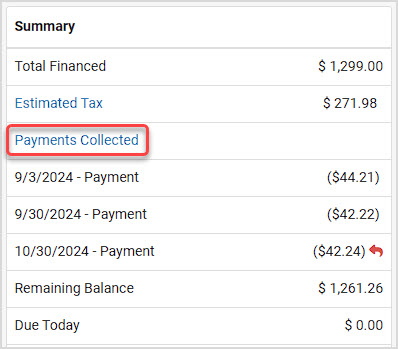
One place you might look to see payment information is in the Rental Contract under Payments Collected. This number will show you amounts collected and the dates they were collected. You can use this as a reference to look up transactions on specific dates. The Attempted Payments area above what is pictured below has a See More link you can click that will give you details on why payment attempts might have failed. You can also look at the customer's History tab under Customers > Customers after searching for and clicking on their name.


Question:

I have someone on Autopay that wants their bill pushed back a couple days because they need to wait until they get paid. How do I do that?

Answer:

Open the contract and in the Payments area, click on the Payment Due Date field. You can adjust the date and the Scheduled Payments area will adjust to the new date. Be sure to Save at the bottom when you're done.


Question:

What happens if somebody's charge doesn't go through because of a bad card on file?

Answer:

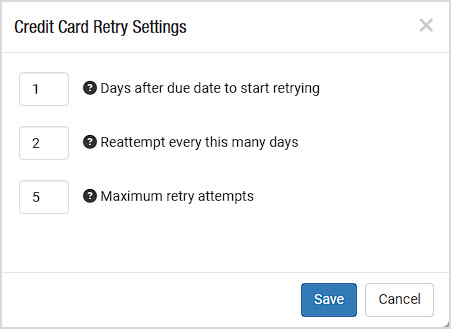
If the customer has Autopay turned on, the system will retry to charge the card based on the settings configured in Settings > POS Settings > Rental Contracts. Scroll down to the Credit Card Autobill Settings area and click the Configure button for retrying cards.


Question:

Somebody called in with their new card and they want to be billed right now. How do I do that?

Answer:

If the customer would like a new card charged immediately, you would go and make a payment through the Register as a normal credit card transaction using the Pay button from the main Rental Contracts page, or with the Make Payment button if you are viewing the open contract. The Autopay requires time to set up the tokenization it uses for the payments, so it cannot go through immediately that way.


Question:

A customer completes their payments for a Rental Contract so they now own the instrument. They contact me as the store saying that they wanted to trade it in before they completed their payments but they forgot. Is there a way to undo the last payment and send the item back into inventory?

Answer:

There is currently not a way to undo completed payments from the original, completed Rental Contract. You would need to treat it as a Trade-In using the Register. For more information on how to process a Trade-In, click here (this link will open in a new browser window for you): Working With Trade-In Item Exchanges


Question:

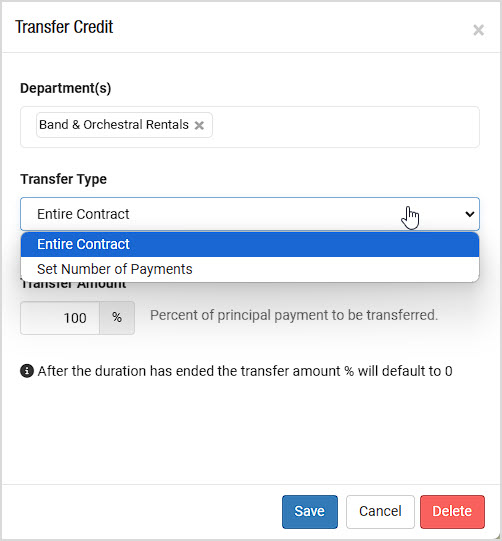
How does rental credit transfer from contract to contract or from contract to sale? I want 40% of principal from the first 12 months to transfer as credit, but I don't see a way to do that in the system.

Answer:

Each merchant has their own way of handling rental credit being transferred. Some take X% of the first year's payments, some take X% of all payments, and others do something else entirely. You are able to go to Settings > POS Settings > Rental Contracts and scroll down to the Contract Exchange Profiles area, and you can set up profiles for different departments, as pictured below. You can either transfer a percentage of the principal, or choose a number of payments and the percentage of principal that will transfer:


Rental Contracts Settings: Auto-Transfer Return Items

Please Note: If you have only a single Location in the MusicShop360 system, you will not see this option.

For multi-location stores, you have the option of auto-transferring your rental items to your primary service and repair location for post-rental cleaning and service, or in cases where the item just needs to go to a certain store location for whatever reason. If you don't prefer to transfer items in this way, there is no need for you to turn on this function. To activate this feature, click the Admin Button with your username in the upper right and go to Settings > POS Settings > Rental Contracts, and you'll see the setting in the upper section, as pictured below.


Working With Your Return Rental Items

With the feature turned on, whenever you receive rental inventory items back from a customer from returns, exchanges, or completed rental contracts, you will be prompted to transfer the item to the store Location of your choice, as pictured below. The default option you'll see is to not transfer the item. The Location drop-list will contain your different locations, and the one that currently has the item will be grayed out. If you have done such a transfer before, the system will remember the previous transfer location and that will display in the list for you by default. You can always change the selection as needed.

If you choose a location and click the Done button, the item will immediately have its Location changed to the desired store and an Inventory History entry for the transfer will be added for the item. Please note if you complete the transfer option this way, a Transfer record in the Transfers module will not be made, the system will just change the item's location to the one you selected.

You have the option for the transfer to Save as Draft. If you check that box, the system will create a Transfer in the module under Inventory > Transfers that will be in Draft status. This is a great option if you need to track the physical transfer of the item with the Transfers module or if you need to add other items to the transfer.


Short Term Rental Reservations and Returns

The area of the system where you'll create your Rentals is the Register. Begin by logging into the system and then on the left side of our blue Admin Toolbar, click the Register Button.

Entering a rental is very similar to completing a normal transaction. Rentals can be initiated in two ways. In both cases the customer's name must be entered first.

Please Note: The system will not allow a rental without customer information.

The first method of entering a rental item is to press the blue Rental link in the register. The second option is entering a unique rental item in the Item Search area as shown below. Please note, that a rental item will be displayed with two horizontal arrows next to it identifying the item as something that is available to rent. Clicking on an item from the search will load it in the Rental Panel.

When the rental panel appears, you’ll see the customer is added to the rental already and additional renters can be added for families or groups. If the customer is picking the item up now, click on the calendar icon and choose the return date and time from the available slots. If the customer is picking up the rental at a later date, press the blue Change to Reservation button and select the Pick Up and Return date(s) and time ranges.

Items can be added by using the search box below the Renter’s name or by scanning/entering the item number, or by pressing the white Browse button. Once an item is entered to rent, you’ll see the calendar appear with the available days and inventory counts. If there are any accessories attached to the item you’ll see a small window appear. If any of the accessories are needed, click on them to add them to the rental item then press the white Close button at the bottom or click on the main screen to exit. The rental item and its accessories will have their available dates shown to the right.

Additional renter's orders can be added at any time by pressing either of the white buttons below the search box and subsequently their name(s) can be edited by pressing the blue Pencil icon next to their name.

If renter information is required for any of the items there will be a green Renter Info button at the bottom of the page that is required before the rental can be saved. These are configured in the Rental Settings Tab. If a waiver/agreement is required, you can print that off at any time by pressing the white Print Waiver/Agreement button, which will open the waiver up in a new printable tab.

You can also configure some options for this Rental window by clicking the gear-shaped button in the upper right of the window. Try different settings to see which configuration will work best for you:

Once the rental has been completed, the details of the rental will be displayed in the Register and can be checked out. To submit a deposit, click the four small purple buttons next to the rental item and choose either cash or card.

Please Note: The deposit is done separately in the line item and then the main rental payment is done the normal way for a transaction.


Deposit Method (Rental Pickup)


Deposit Payment Panel

You can edit the rentals prior to checkout by clicking the orange Edit button in the Rental line-item.


Returning/Exchanging Rental Items

You can run returns on Rental transactions by scanning the receipt barcode or by pulling the customer’s name up in the register and clicking on the rental icon in the top right to find their rental transaction. Next to each rental transaction will have a Return button. Click on that to begin the return process. Upon return of Rental items, any late fees are automatically calculated. The sales clerk may edit the pricing. Any late fees and/or additional purchases, are subtracted from the rental deposit.

Additionally, details of any rental may be found in the Rental Status or Rental Calendar items under the Modules menu as pictured below.

Clicking on any rental item will pull up its full details, including renter contact information, dates/times, price, and item details.

In addition to viewing rental statuses, you can also return or exchange items by pressing either the white Open in Till button (for exchanges or edits) or the blue Return button (for full or specific item returns).


Special Order Placeholder Items

Overview of the Special Order Placeholder Feature

The Special Order Placeholder is designed to streamline the process of handling special orders when the exact product details are not immediately available. This feature is particularly useful for users who lack the necessary permissions to create products in the store's system but need to take down notes of what the customer is ordering.


Create a Special Order Placeholder Item

  1. Go to the Register by clicking the Register Button in the upper left. This is where you'll start the Special Order.
  2. Search for the Customer you want.
  3. Click on any of the Customer Actions icons in the upper right to open the Customer Actions panel. Please note: If the customer has any Special Orders, the Ticket icon will be highlighted in gold, as pictured here.

  1. In the Customer Actions panel, find the section for Special Orders and click the + button to start a new Special Order.

  1. In the New Special Order panel, next to the item search, click the New button and in the drop-list, click New Placeholder.

  1. In the Create Placeholder window that opens, enter the Placeholder item details:

    • Enter a Product Title.

    • Enter an Estimated Price and a Quantity of at least 1 (quantity is required).

    • It is optional for you to set a Department, Vendor, and Product Type.

    • Add any relevant notes and media, if available.

  2. Save the Placeholder item.

    • Click Save to return to the Special Order.

    • If you need to create additional Placeholders for the Special Order, click Save and New.

  3. Once you have created the Placeholder items you need, click the Add to Register button and finalize the Special Order by completing the initial transaction.

  4. Once you know the actual products the Placeholder items represent, you will need to change each Placeholder item into a real product:

    • Go to Modules > Special Orders and find the Special Order you want in the list. You will see each item in the Special Order as a separate line item.
    • Click on a Placeholder item to open it in the Special Order details panel.
    • Notice that a placeholder has a status of Incomplete. Click the Finish Creating Product link.

  1. After you click to Finish Creating Product, the item will open in an Edit Product window. Add all necessary product details in the product page and then Save and Close the product window.
  2. Notice that the product no longer has the Finish Creating Product link and the status has changed to Created. Now you can add the product to Purchase Orders or directly to the Register and it will function like any other standard product.


Fulfilling a Special Order with Placeholder Items

Placeholder items cannot be fulfilled. If you click the Fulfill Order button at the bottom of the Special Order, any Placeholders in the SO will not load into the fulfillment window. The example Special Order above has two Placeholders and one item that was converted into a standard Product. If a standard product and a Placeholder are in the same Special Order and click the Fulfill Order button, only the created product will show in the Manual Fulfillment window, as pictured below.


Creating a Product from a Placeholder in a Purchase Order

You can also view and create a product from a Placeholder item in a Purchase Order. Here is how to work with Placeholders in a PO:

  • Create a new Purchase Order by clicking the +Create New button in the upper right and clicking Purchase Order in the drop-list.
  • Click the Vendor drop-list and click on the vendor you want.
  • Click the Purchase Queue button on the right, and the Purchase Queue panel will open.
  • Find the section titled Incomplete Special Orders.
  • Click the View button next to the Placeholder you want to convert to a product.
  • The Special Order will open and you'll be able to click to Finish Creating Product as described above in steps 10-11.
  • Once the product has been created it will move from the Incomplete Special Order section to the Special Orders section where it can be added to the Purchase Order.

Please Note: For staff members who do not have the User Group permission to create new products but but who need to create special orders, this functionality will not allow them to convert Placeholders to products.


Frequently Asked Questions

Can I edit a placeholder after saving it? 

Yes, placeholders can be edited by accessing them through the special order's list page or through the purchase order queue.


What happens if I don't complete the product creation?

The placeholder will remain with an Incomplete status and cannot be fulfilled until you convert it to a product.


Is it mandatory to add media to a placeholder?

No, adding media is optional but can be helpful for reference.

The info on the Advanced tab of my class doesn't show up on the class's web page, how do I get it back?

This information does not display if you are using the 'Version 2 Preview' setting for your Classes. That setting enables the use of the Materials tab of your classes, so at this time, you cannot display both the Materials tab and the Advanced tab information for a class. To enable or disable that setting, once you have logged into Music Shop 360 as an Administrator (your login link should look like ' yourwebsitename.rainadmin.com/admin';), on the far right side of the blue Admin Toolbar, click the gear-shaped button. In the drop-list, click on Settings > Website Settings, and in the first tab that comes up (Calendar & Classes), scroll down to the second section and you can check or un-check the box for Version 2 Preview. If you made any change on the settings page, be sure to scroll to the bottom of the page and click Save.